Dark Chocolate Mint Fudge

Mint Fudge

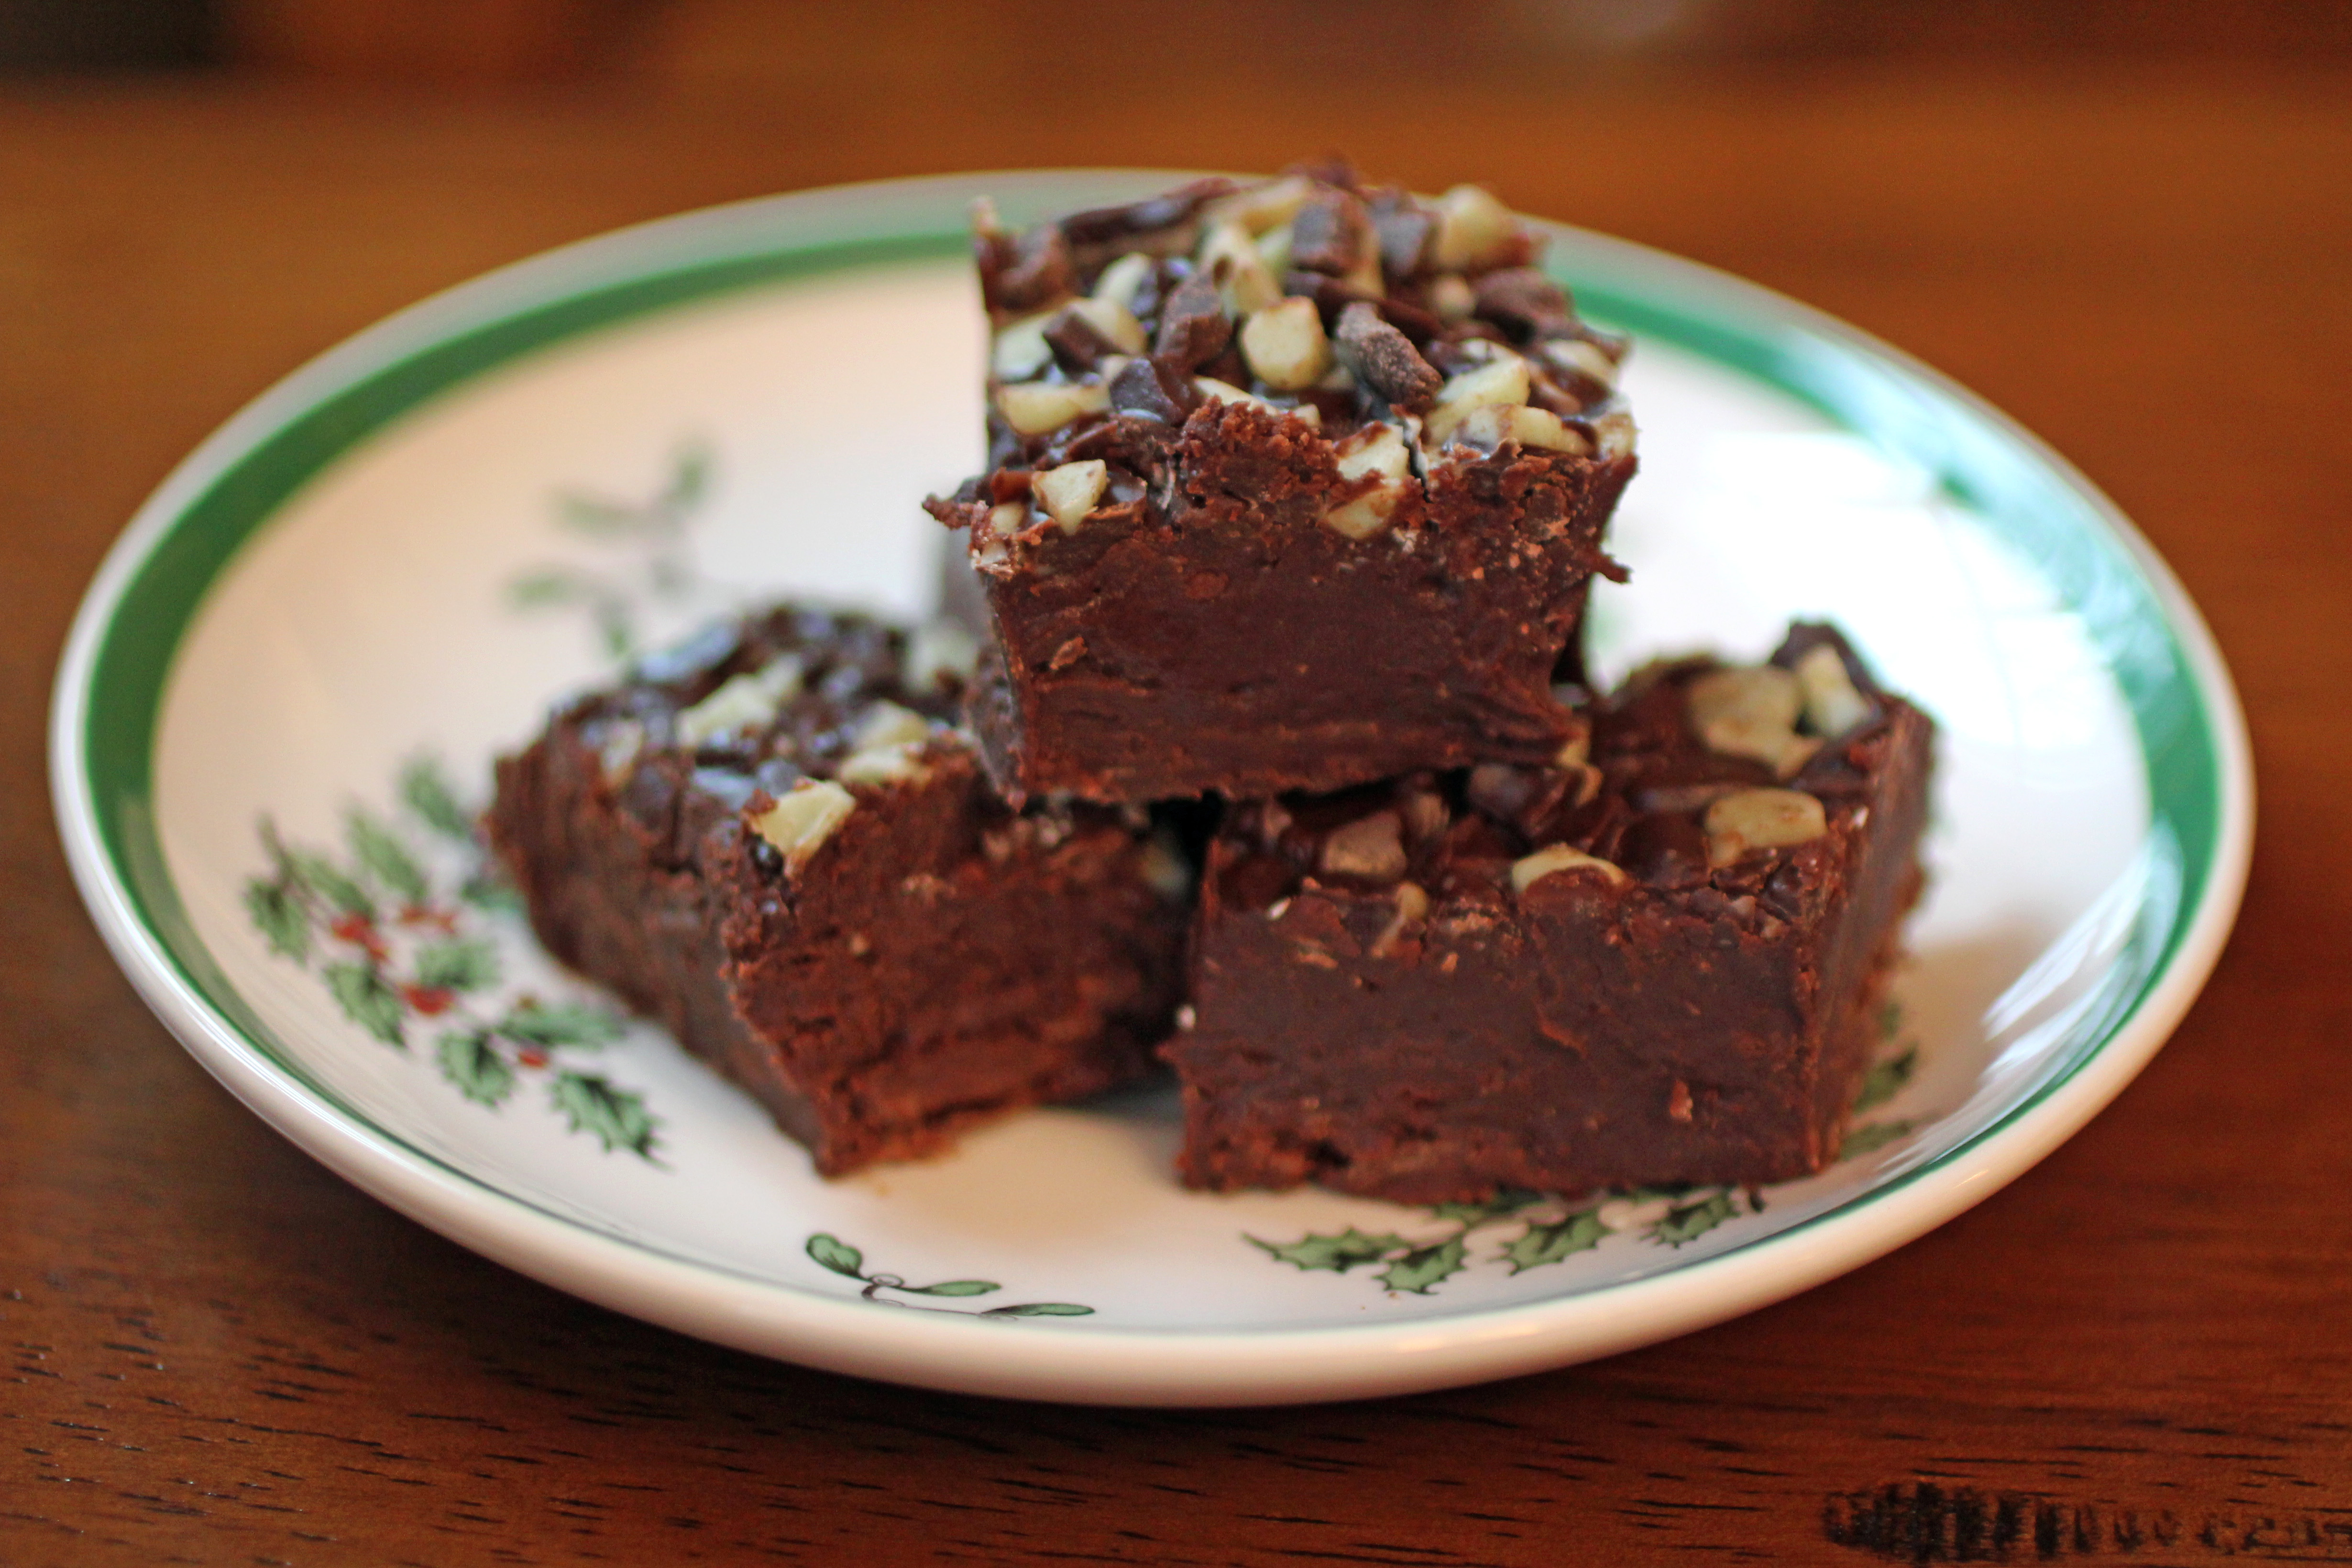
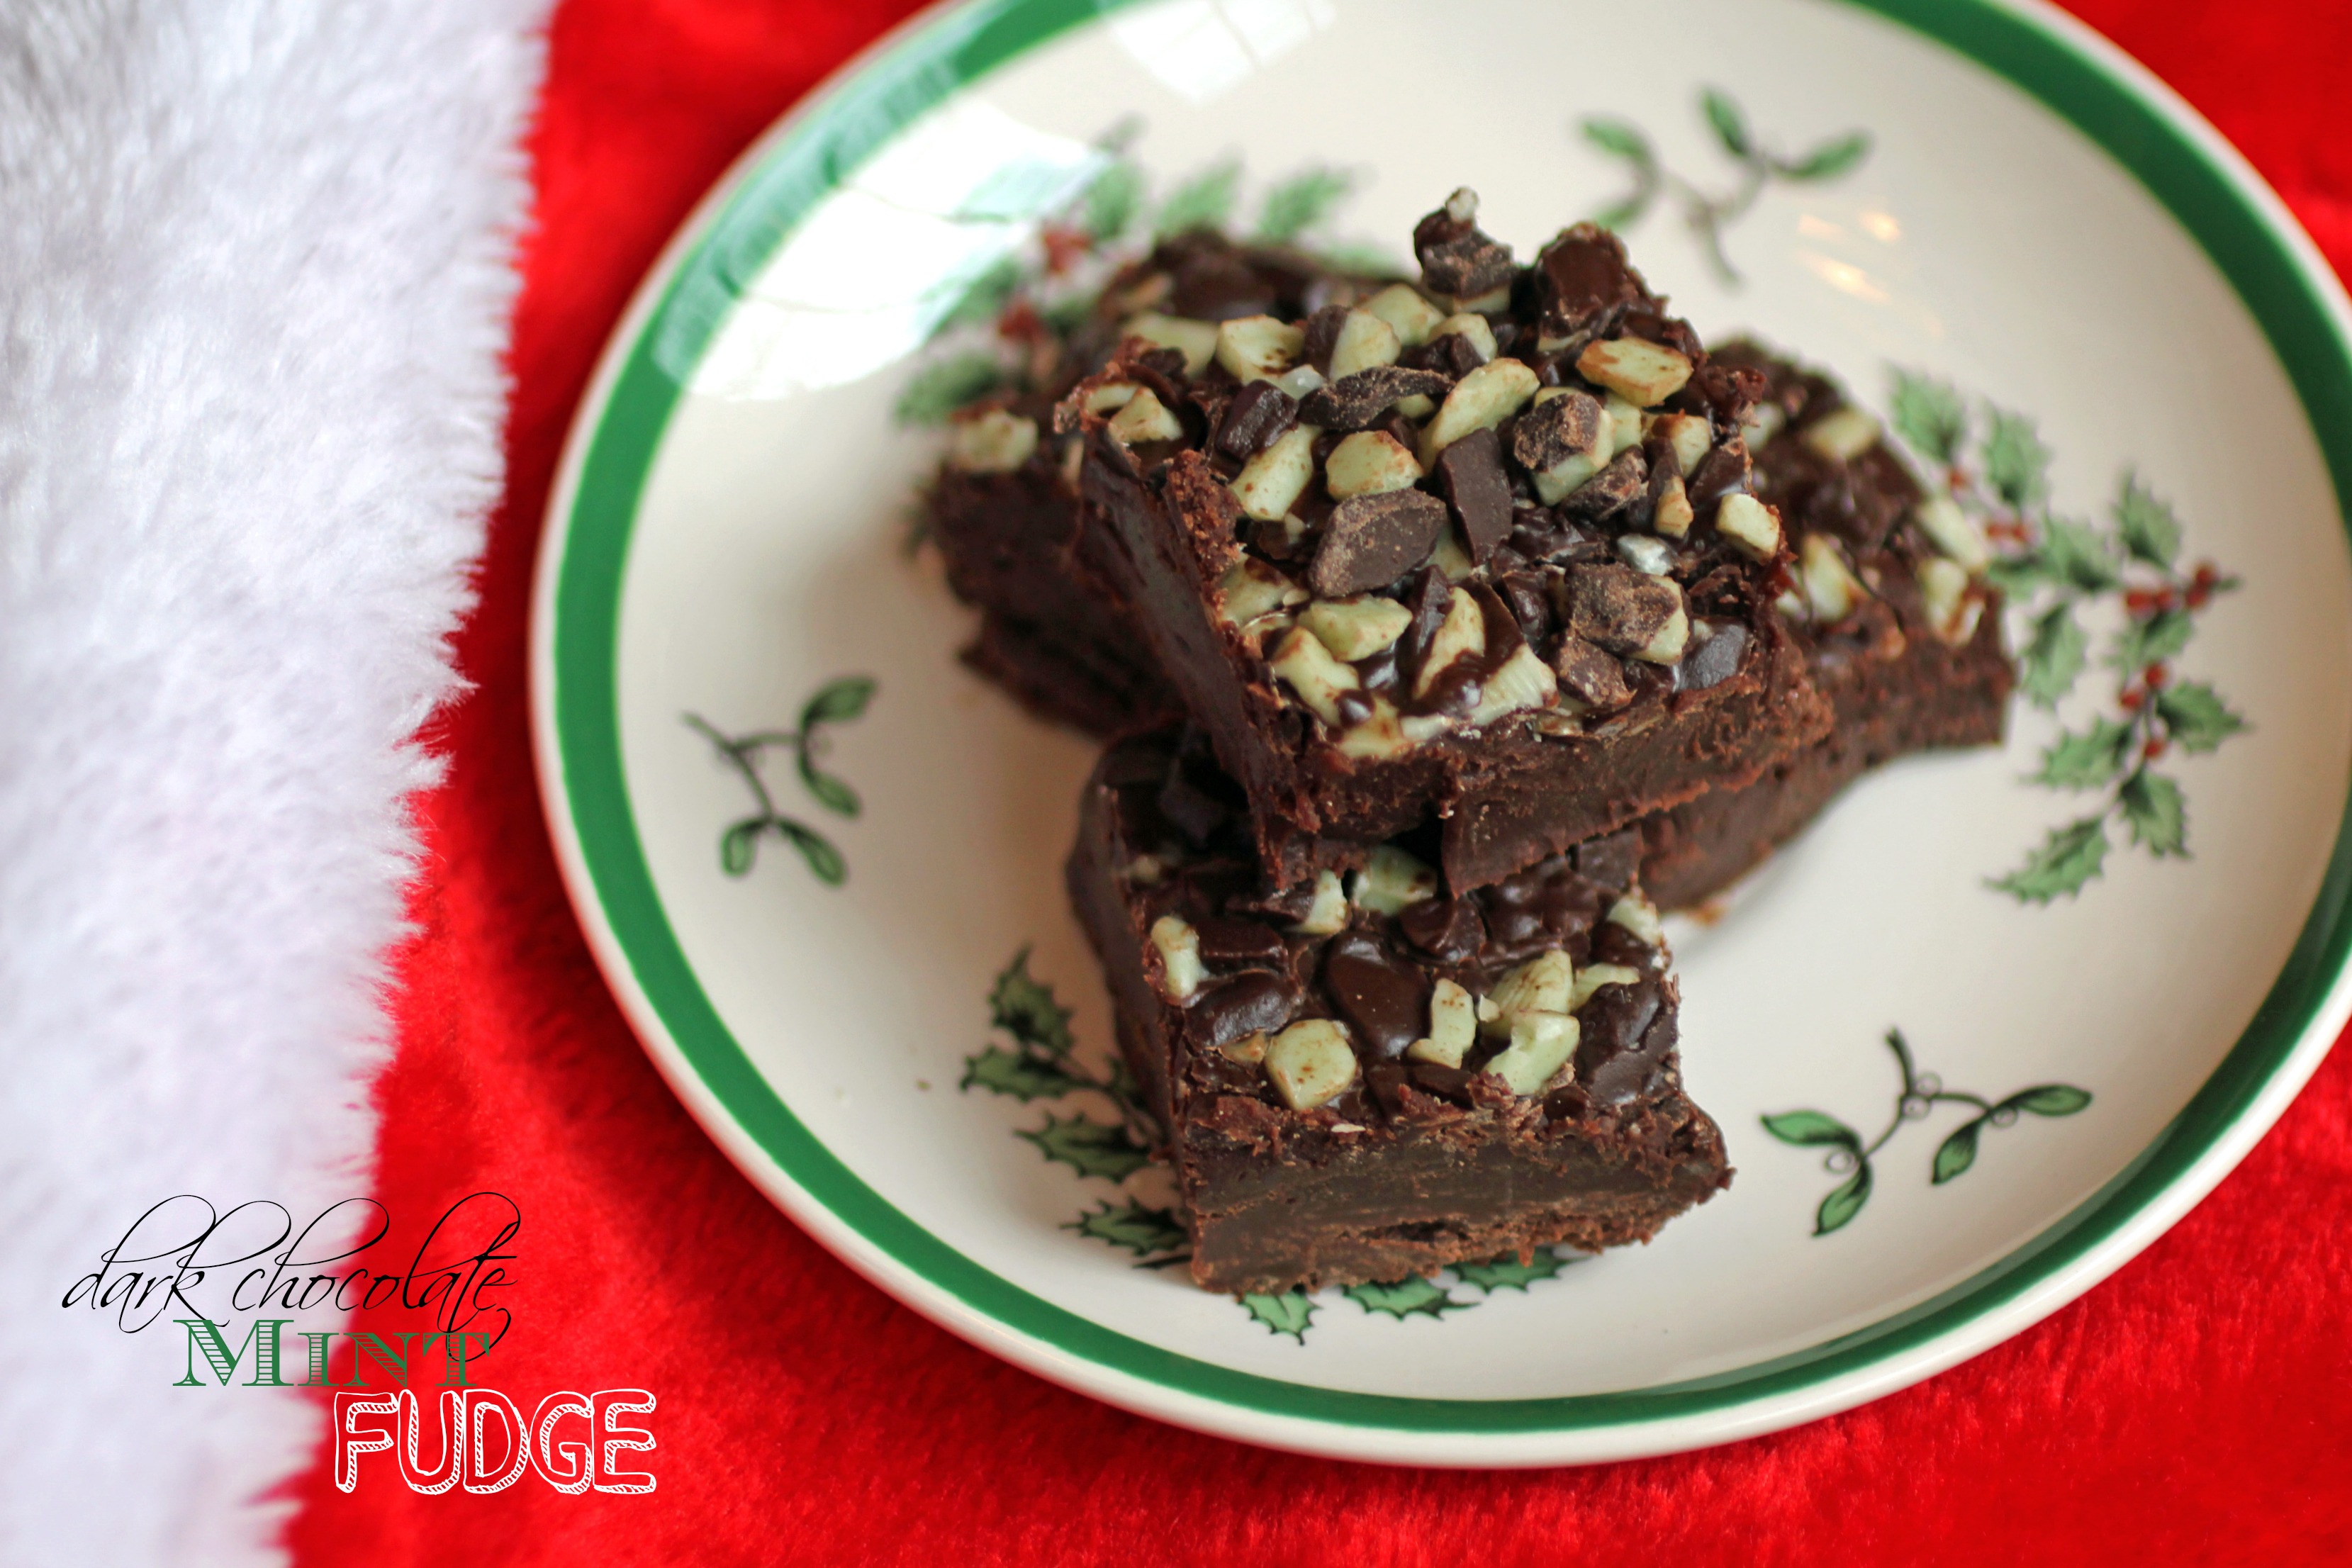
I wasn’t planning to post again before Christmas but I made this dark chocolate mint fudge on Friday evening and it’s too sinful not to share.  This fudge is very simple to make and tastes decadent and indulgent.  If you’re looking for a last minute gift or just something to enjoy with your family, this is perfect.

Mike and I have been enjoying our time off with the kids.  We’ve built forts and Lego creations, cuddled on the couch while watching Polar Express, and cooked plenty of yummy food.  Today, we’re going to the movies to see Frozen.  The countdown to Santa is in full swing and we’re enjoying every minute. I hope you’re enjoying the season as well.

I love the combination of chocolate and mint — but during the holidays it seems to taste even better.

Dark Chocolate Mint Fudge
Author: 
Prep time: 
Cook time: 
Total time: 
Serves: 24
 
Ingredients
  • 3 - 10 oz. bags dark chocolate chips
  • 1 - 10 oz. bag Andes mint baking chips
  • 1 Tbsp. butter
  • 1 can sweetened condensed milk
  • ½ to 1 cup heavy whipping cream
  • ¼ tsp. peppermint extract
  • ⅛ tsp. vanilla extract
  • ¼ tsp. salt
Instructions
  1. Spray a 9 x 13 inch pan with cooking spray or line with foil. In a large saucepan, heat the butter over low heat. Once the butter has melted, add the sweetened condensed milk, dark chocolate chips, and 1 cup of the Andes chips. Stir constantly until the chocolate has melted. Add the heavy cream ⅛th of a cup at a time and continue stirring until the chocolate no longer looks granulated and appears more glossy. It should look like thick, glossy, chocolate cake batter. You do not want it to be too thin. Remove from heat and add the salt and extracts. Pour the hot mixture into the prepared 9x13 pan and smooth. Top with remaining Andes chips. Refrigerate for several hours until set.

Mint Fudge 2

Pumpkin Mini-Chocolate Chip Bars

Things have been crazy here at the Five Wooden Spoons house — you’ve probably noticed that I haven’t posted a recipe in eons.  Well — this is due to a lot of factors — too much work, three kiddos with school and activities, and I’ve just felt uninspired to photograph food lately.  I’m still cooking — we have to eat — but I just never love the photos I take, so then I stop taking them.

Ultimately, no one cares (but me…) if my photos are perfect.  So I just need to get over it. Hence, another imperfect photo.

I’ve also been busy being social.  We constantly have something going on with friends these days – which is definitely a good thing!  Last Friday, I hosted a “Mom’s Night Sleepover” at my house.  I invited a big group of moms to my house in their pjs or yoga pants to eat, relax, and chat.  We had good intentions of playing a game, but that never happened. Three of us – Jamie, Jocelyn, and myself — somehow stayed awake the entire night.  I was awake and going for just over 31 hours before I convinced Bo to take a nap with me.  Crazy.

But anyway, for the sleepover, I made these pumpkin mini-chocolate chip bars and they were delicious.  Bo and I cut them into squares and ate all of the edges before the moms arrived.  These are perfect for fall and were perfect for a gathering.

Pumpkin Mini-Chocolate Chip Bars
Author: 
Prep time: 
Cook time: 
Total time: 
Serves: 12
 
Ingredients
  • 2 cups all-purpose flour
  • 2 tsp. pumpkin-pie spice
  • 1 tsp. baking soda
  • ¾ tsp. salt
  • 2 sticks butter, at room temperature
  • 1¼ cups granulated sugar
  • 1 large egg
  • 2 teaspoons vanilla extract
  • 1 can pumpkin puree
  • 1 cup semi-sweet mini-chocolate chips
Instructions
  1. Preheat oven to 350 degrees. Spray a 9x13 pan with Baking Pam. Cream the butter and sugar until smooth. Add the egg, vanilla, and pumpkin. Reduce speed and add dry ingredients until just combined. Fold in the mini-chips. Spread the batter in the pan and bake for 35-40 minutes.


Key Lime Pie

One of Mike’s favorite desserts is Key Lime Pie.  When he went to the store last week (he runs by the store after work often) he picked up ingredients for the pie and left them on the counter.  I took it as a not-so-subtle hint that he wanted a piece of Key Lime Pie in the near future.

The best part about Key Lime Pie is it is super quick and easy to make — but seems much more fussy.  It’s literally a 20 minute recipe and most of that is baking time!

Key Lime Pie
Author: 
Prep time: 
Cook time: 
Total time: 
Serves: 8
 
Ingredients
  • 1 prepared graham crust
  • 1 can sweetened condensed milk
  • ½ cup key lime juice
  • 4 egg yolks
  • dash of green food coloring
Instructions
  1. Preheat oven to 375. In a medium bowl, beat together the egg yolks, key lime juice, sweetened condensed milk, and the food coloring. Pour into the graham crust. Bake for 15 minutes. Refrigerate before serving for at least 2 hours.


Homemade Cherry Pie

We just returned from spending a week with our favorite family — The Kilmartin’s — on a week-long vacation in Michigan.  We rented a house a block from Lake Michigan and enjoyed hours at the beach.

One of our adventures was cherry picking.  We went to Jollay Orchards by St. Joseph, Michigan and rode on a hay ride back to the sour cherry trees to pick.  None of us had ever been cherry picking before and we — including the kids — quickly filled two buckets with fresh cherries.  Even the Kilmartin’s youngest, Cara, was in on the action.

Luckily, the orchard had a pitting machine so we had the cherries pitted and then took them back to our house and I threw together a cherry pie.  I had to substitute a bit from a traditional recipe because we didn’t have lemon juice, but the pie turned out to be delicious.

Since we were on vacation, I didn’t make the crust from scratch — opting to cheat and use the packaged crusts.  But if I would have been home, with all of my flour, baking soda, and the like I would have made Dorie Greenspan’s pie crust.  It’s the only one I’ve ever made successfully!

Homemade Cherry Pie
Author: 
Prep time: 
Cook time: 
Total time: 
Serves: 8
 
Ingredients
  • 5 cups fresh sour cherries, pitted
  • 1 cup sugar
  • 3 heaping tablespoons cornstarch
  • 2 tablespoons orange juice
  • 1½ teaspoons vanilla
  • 2 tablespoons milk
  • 2 tablespoons sugar
Instructions
  1. In a large bowl, combine the sugar, cornstarch, juice, and vanilla to form a paste. Add the cherries and coat.
  2. Pour the cherry mixture into the bottom crust of the pie and then cut the top crust into strips to form a lattice pattern. Brush the lattice with milk and sprinkle with sugar.
  3. Bake at 425 for 45 minutes.


Beef-n-Noodles

These noodles were my favorite meal growing up.  My mom would serve them with mashed potatoes and green beans with shelley beans and I couldn’t have been happier.  Now, my trio enjoys them.  And the best part — they are super easy to make thanks to a secret ingredient from the freezer section that makes them “semi-homemade.”

The secret ingredient is Reese’s frozen noodles.  Instead of slaving over homemade noodles, I just grab a package of these and cut the prep-time significantly.

Apparently, beef-n-noodles is a “southern” thing — not the true south — but a Southern Illinois thing at least.  After I married Mike (he’s from the suburbs of Chicago) and made noodles as part of the meal for the first Thanksgiving I hosted — I quickly learned that these noodles aren’t “normal” in families from North of I-80.

No matter if you’ve had beef-n-noodles before or you’ve never tried them — give this recipe a try.  They are a delicious comfort food and I’ve yet to meet a kid who doesn’t love them.

Beef-n-Noodles
Author: 
Prep time: 
Cook time: 
Total time: 
Serves: 8
 
Ingredients
  • 4 cups beef stock
  • 1 cup cooked beef chunks (I use leftover roast beef)
  • 2 beef bullion cubes
  • water
  • 1 bag Reese's Frozen Noodles
  • pepper
  • salt
Instructions
  1. In a large pot (I use a stew pot) combine the beef stock, beef chunks, and beef bullion cubes. Add water until the pot is ¾ full. Heat until boiling. Add the noodles and reduce heat. Cook on low for several hours, adding water as needed. The longer they cook, the better they taste! Add generous amounts of pepper and salt before serving. Great with mashed potatoes.


Taco Salad Dip


Happy 4th of July! (And Happy Birthday to me…) Are you looking for a recipe to take with you to a pool party or pre-firework’s bash?  This one is a great pick!  And super easy!

Last week, Mike was motivated to make this yummy taco salad dip.  Life has been a bit chaotic – we had a large garage sale and all of the setup and house cleanup that comes with it – combined with three small children and a full-time job (plus a few side jobs) mean that I haven’t had much time in the kitchen recently.

On Saturday, while I was outside working the garage sale, Mike took the kids to the grocery store and bought the ingredients for this dip which he made on Sunday.  It’s tasty!  We ended up eating it for dinner but it would be a great dish to bring for a picnic or potluck — or even just to serve as an appetizer.

I took the leftovers in a small container on a picnic with the trio on Tuesday.  The kids wouldn’t touch the stuff — but that just meant more for me!

Kudos to Mike for this yummy dip.  And from rescuing us from another meal of foraging through the pantry. 🙂

Taco Salad Dip
Author: 
Prep time: 
Cook time: 
Total time: 
Serves: 8
 
Ingredients
  • ½ lb. hamburger, browned
  • 1 - 15 oz can refried beans
  • 8 oz tomato paste
  • 1 package taco seasoning
  • ¼ cup chopped white onion
  • 2-3 drops tabasco sauce
  • ½ tsp. garlic salt
  • ½ cup sour cream
  • ¼ tsp. chili powder
  • 1 cup shredded Mexican blend cheese
  • 1-2 cups shredded lettuce
  • 1 small tomato, diced
Instructions
  1. Brown hamburger and drain. Add refried beans, tomato sauce, taco seasoning, chopped onion, tabasco, and garlic sauce. Simmer until heated through and bubbly. Spread into a 9x13 pan. In a small bowl combine the sour cream and chili powder. Spread over the meat mixture. Top with cheese, lettuce, and diced tomato. Good served hot or cold with tortilla chips or corn chips.


Cookie Butter Baked Oatmeal

Recently, breakfast has been baking time.  With the trio on summer break, we rarely have anything scheduled before 10 am, which gives us plenty of time to make yummy breakfast goodies in the morning.

This recipe was inspired by a jar of Trader Joe’s Cookie Butter that has been hanging out in my cabinet since Christmas.  It’s similar to Biscoff spread so either ingredient should work in this recipe.  The resulting oatmeal has that spicy cookie flavor — and it was the perfect recipe for the dreary and rainy day.  (Pardon the photo quality — it was raining and dark so there was no natural light).

I made this in a round 2 quart Corningware dish, but when I make it again I think I will make it in a 9×13 inch pan and cut it into squares.  Also, you can serve it with syrup, but I didn’t think it was necessary so we just ate ours plain.  The kids loved it.

Cookie Butter Baked Oatmeal
Author: 
Prep time: 
Cook time: 
Total time: 
Serves: 6
 
Ingredients
  • 1¾ cups old fashioned oatmeal
  • 1½ tsp baking powder
  • ½ cup Cookie Butter
  • 1¼ cup milk
  • 3 eggs
  • 1 tsp vanilla
  • ¼ cup sugar
Instructions
  1. Spray a large dish (round or 9x13) with PAM. In a large bowl, mix the oats and baking powder together. In a separate bowl combine the cookie butter, eggs, milk and vanilla and mix well. Mix the dry ingredients and wet ingredients together and pour into prepared pan. Bake for 25-30 minutes or until set.

Anna requests chocolate chip oatmeal nearly every day and she gave this “special” Cookie Butter Baked Oatmeal two thumbs up — and a tongue out for good measure. 😉

Bananas Foster Muffins

Sorry for the hiatus.  Vacation.  Work.  Summer break.  A brief stint in hard-core low-carbing.  None of it has been conducive to a cooking blog.

The trio and I have been going on outings on Tuesdays and Thursdays to enjoy summer.  Last Tuesday, we headed to Bloomington to go to Chuck E. Cheese with the Kilmartin’s — but before we headed out I whipped together these bananas foster muffins for breakfast with overripe bananas that were calling me from my countertop.  I’m always looking for new ways to use up old bananas…

These muffins were a hit with the trio — they all loved them.  The flavor is perfectly bananas foster.  Delicious!  These were great for breakfast but would also make a fantastic dessert served with ice cream and real bananas foster!

Bananas Foster Muffins
Author: 
Prep time: 
Cook time: 
Total time: 
Serves: 6
 
Ingredients
  • 1 ½ cups mashed, very ripe bananas (I used 4)
  • ½ cup brown sugar
  • 1½ sticks unsalted butter, divided
  • 3 Tbsp dark rum
  • ¼ cup white sugar
  • 1 large egg
  • 1 tsp. vanilla
  • 1 tsp. cinnamon
  • 1½ cups all-purpose flour
  • 1 ½ tsp. baking soda
  • 1 tsp. salt
Instructions
  1. Preheat oven to 350. In a small saucepan, melt a stick of the butter. Add the bananas and brown sugar and caramelize. Remove from heat and add the cinnamon and vanilla. Allow to cool slightly.
  2. In a mixer, combine the remaining butter and white sugar. Add the egg and mix well. Add the cooled banana mixture, baking soda, and salt. Mix in the flour until just combined.
  3. Spray 12 muffin liners with PAM and fill ⅔rds full. Bake for 18-20 minutes.


Laura’s Coca-Cola Cake

*****The Weitl clan is on vacation so this post was graciously written by the infamous Laura.  Special thanks to one of my BFFs for contributing!!******

I love Coca-Cola. I love chocolate. I love cake. What I didn’t realize until recently is that I could put all of those things together and come up with delicious yumminess.

I love the get togethers we have with the Weitls. I was supposed to bring a dessert for one of our family dinners and decided to make Chocolate Coca-Cola Cake. I had made it once before and shared a few pieces with Jamie and she really liked it so I decided to make it again. No one was disappointed.

Before this recipe, I had never made a cake from scratch. I didn’t see the point since opening a box was so easy. After this, though, a box cake just isn’t quite good enough. The ingredients are easy to find. In fact, I had all of them in my house when I decided to make it the first time except for one… buttermilk. That was easy to remedy though. Just put ½ Tbsp. of white vinegar into a ½  cup measuring cup and then fill the cup with milk. Let it stand for 5 minutes and you have buttermilk substitute. Clean up is easy as well. There aren’t a lot of dishes to deal with. The hardest part is waiting for the cake to cool a bit before pouring on the frosting.


Coca-Cola Cake
Author: 
Prep time: 
Cook time: 
Total time: 
Serves: 12
 
Ingredients
  • Cake Ingredients:
  • 2 cups flour
  • 2 cups sugar
  • ½ tsp baking soda
  • ½ tsp cinnamon
  • 2 sticks softened butter
  • ¼ c. unsweetened cocoa powder
  • 1 c. Coca-Cola
  • ½ c. buttermilk
  • 2 eggs
  • 1 tsp vanilla (I used Jamie’s Homemade Vanilla)
  • Frosting Ingredients:
  • ½ c. butter
  • ¼ c. unsweetened cocoa powder
  • ½ c. Coca-Cola
  • 4 cups powdered sugar
Instructions
  1. Cake Directions: Preheat oven to 350degrees. In a large bowl, combine flour, sugar, baking soda, and cinnamon. Set aside. Put butter, cocoa powder, Coca-Cola, and buttermilk in a saucepan over medium heat. Stir until it comes to a boil. Remove from heat and pour it into the flour mix. Stir until combined. Add 2 eggs and 1 tsp vanilla. Mix. Pour into greased 9x13. Bake for approximately 30 minutes. I like to take it out a little early so it is nice and moist.
  2. Frosting Directions: Combine butter, cocoa powder, and remaining Coca-Cola in a saucepan (I use the same one I used for the cake) over medium heat until it comes to a boil. Remove from heat. Slowly whisk in powered sugar until smooth. Pour frosting over warm cake.


This cake receives 10 Wooden Spoons — a very high honor!  5 from the Weitl clan and 5 from the Kilmartin clan.  We all loved it and devoured it — as you can tell from Cade’s chocolatey face above!

Mexican Lasagna


I originally made this recipe about 4 years ago and Mike wasn’t a fan.  I made it again last week and he thought it was great.  Someone’s palate is expanding.  Thank the Lord!

This recipe is a great alternative to the traditional “taco night” – basically it’s a combo of enchiladas and tacos in lasagna form.  It tastes great and reheats very well for leftovers.  I ate it for breakfast the next morning.  I actually ate this four times — two dinners, once for lunch, and once for breakfast.  It’s delicious.  We served it with Mike’s infamous BLT guacamole.

Definitely a winner — and a recipe that I’ll be adding to our regular rotation.

Mexican Lasagna
Author: 
Prep time: 
Cook time: 
Total time: 
Serves: 8
 
Ingredients
  • 1 lb hamburger
  • 10-15 corn tortillas
  • 1 large can enchilada sauce
  • 1 can fat free refried beans
  • ½ cup chopped onion
  • ½ cup chopped green pepper
  • 1 bag shredded Mexican blend cheese
  • diced tomatoes
  • lettuce shreds
  • sour cream
Instructions
  1. Preheat oven to 350. In a skillet, brown hamburger, onion, and green pepper. Drain. Add enchilada sauce and refried beans and cook until bubbly. Spray a casserole dish with Pam and place tortillas in the bottom (I broke some of them in pieces to mostly cover the bottom. Pour ⅓ of the hamburger mixture over the top of the tortillas and then ⅓ of the bag of shredded cheese. Repeat layers 2 more times. Bake for 20-25 minutes until bubbly. Top with diced tomatoes, lettuce, and sour cream.